Carburetor Rebuild Kit | Honda CB360 / CL360 / CJ360
Original price was: $20.00.$10.69Current price is: $10.69.
21 in stock
Description
Carburetor Rebuild Kit | Honda CB360 / CL360 / CJ360
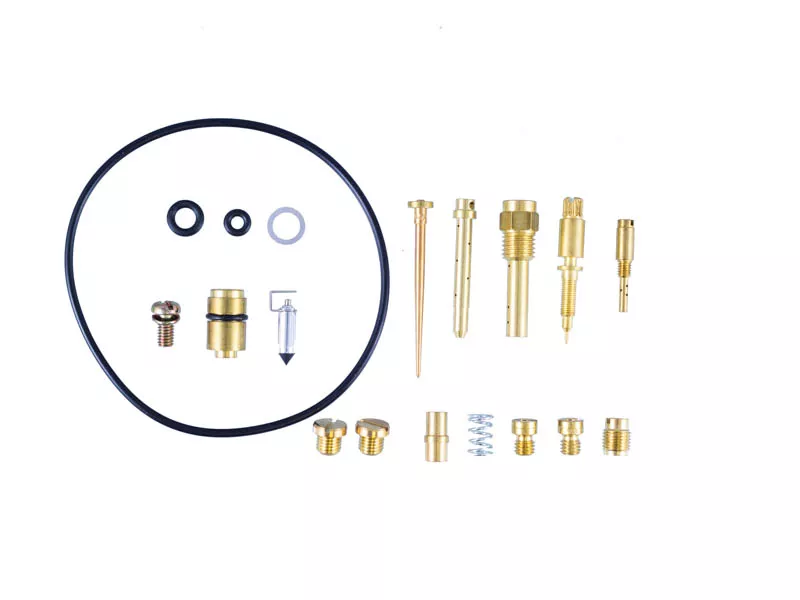
The factory Keihin CV carburetors on the Honda 360 twins are tough, but after decades of sitting they fill with varnish and corroded brass. This rebuild kit replaces all the wear items inside a single carburetor body — jets, float needle and seat, emulsifier tubes, discharge nozzle, and all four O-rings. Assembled in-house at Common Motor Collective.
Note: Kits are sold individually. You will need to order TWO kits to service both carburetors.
Why You Need This
Stale fuel degrades in as little as 6–12 weeks. The varnish it leaves behind clogs the tiny passages inside the Keihin 745-series carburetors and corrodes the brass jets. Symptoms include hard starting, rough idle, bogging under throttle, poor fuel economy, and fuel leaking from the float bowl drain. A full rebuild with fresh brass and new seals is the only reliable fix — carb cleaner alone will not dissolve hardened varnish deposits inside jet orifices.
This is the most complete CB360 / CL360 / CJ360 carburetor rebuild kit on the market. Every brass piece and O-ring is included so you can do the job once and do it right. No substandard knockoffs — precision-engineered components assembled in Houston, TX.
Specifications
| Spec | Detail |
|---|---|
| Replaces OEM Part Numbers | 16010-369-004, 16011-369-004, 16016-367-690, 16016-369-004, 16023-369-004, 99114-246-1000, 99124-286-0351, 99101-369-0680 |
| Fits Models | CB360G (1974), CB360T (1975–1976), CL360K0 (1974), CL360K1 (1975), CJ360T (1976–1977) |
| Carburetor Type | Keihin CV (Constant Vacuum), 745-series |
| Sold As | Individual kit (one per carburetor — order two per bike) |
What’s in the Kit
- Main jet 100 and 105 (down from the factory 110 for improved performance with stock air filters)
- Secondary jet 68
- Pilot / slow-speed jet 35
- Float needle and seat with retaining screw and O-ring
- Main and secondary emulsifier tubes
- Main discharge nozzle
- Vacuum port plug and idle jet passage plug (x2)
- Main jet needle
- Idle mixture screw with spring and O-ring
- Float bowl O-ring
- Float needle seat O-ring
- Drain plug O-ring
Installation
Difficulty: Intermediate
- Remove the carburetors from the bike and separate them from the backing plate
- Remove the float bowl, all jets, emulsifier tubes, float needle and seat, idle mixture screw, and passage plugs
- Clean every passage with compressed air and fine wire — the carb body should be spotless before reassembly
- Install the secondary emulsifier tube first, pressing gently into place with a screwdriver
- Thread in the secondary jet (68), then the pilot jet (35) — snug only, do not overtighten brass fittings
- Install the primary emulsifier tube (hex head), then thread in the main jet
- Install the float needle seat with its O-ring, then the retaining clip and screw
- Set the float and adjust the float height to 16 mm rather than the factory 18.5 mm spec — this often yields better real-world results
- Install the float bowl with a new O-ring, the drain plug with its O-ring, and the idle mixture screw with its spring and O-ring
Idle mixture screw baseline: Turn the idle mixture screw gently all the way in, then back out 2 full turns as a starting point. Final adjustment should be made with the engine at operating temperature and idle set to 1,200 rpm.
Related products
-
- Sale!
- hot sale
Empulse M90 Power Assist
- Original price was: $3,816.00.$2,767.31Current price is: $2,767.31.
- Add to cart
-
- Sale!
- hot sale
YADEA Y80 REAR AXLE
- Original price was: $7.20.$4.10Current price is: $4.10.
- Add to cart
-
- Sale!
- hot sale
eDragonfly 2.0 Electric Assisted Handcycle
- Original price was: $1,559.40.$976.86Current price is: $976.86.
- Add to cart
-
- Sale!
- hot sale
Yadea Trooper 01 Chain Tensioner – Genuine OEM
- Original price was: $23.20.$14.92Current price is: $14.92.
- Add to cart
-
- Sale!
- hot sale
Zippie Backpack
- Original price was: $68.00.$42.63Current price is: $42.63.
- Add to cart
-
- Sale!
- hot sale
YADEA COCOA REAR WHEEL ASSEMBLY
- Original price was: $199.20.$102.45Current price is: $102.45.
- Add to cart
-
- Sale!
- hot sale
Cup Holder Universal Mount Kit
- Original price was: $28.80.$21.70Current price is: $21.70.
- Add to cart
-
- Sale!
- hot sale
Battery charger UL/ USA (Gen 2.0)
- Original price was: $19.96.$12.07Current price is: $12.07.
- Add to cart