Gasket Kit (Overhaul) | Honda CB175 / CL175 / SL175
Original price was: $40.00.$24.59Current price is: $24.59.
27 in stock
Description
Honda CB175 / CL175 / SL175 Gasket Kit (Overhaul)
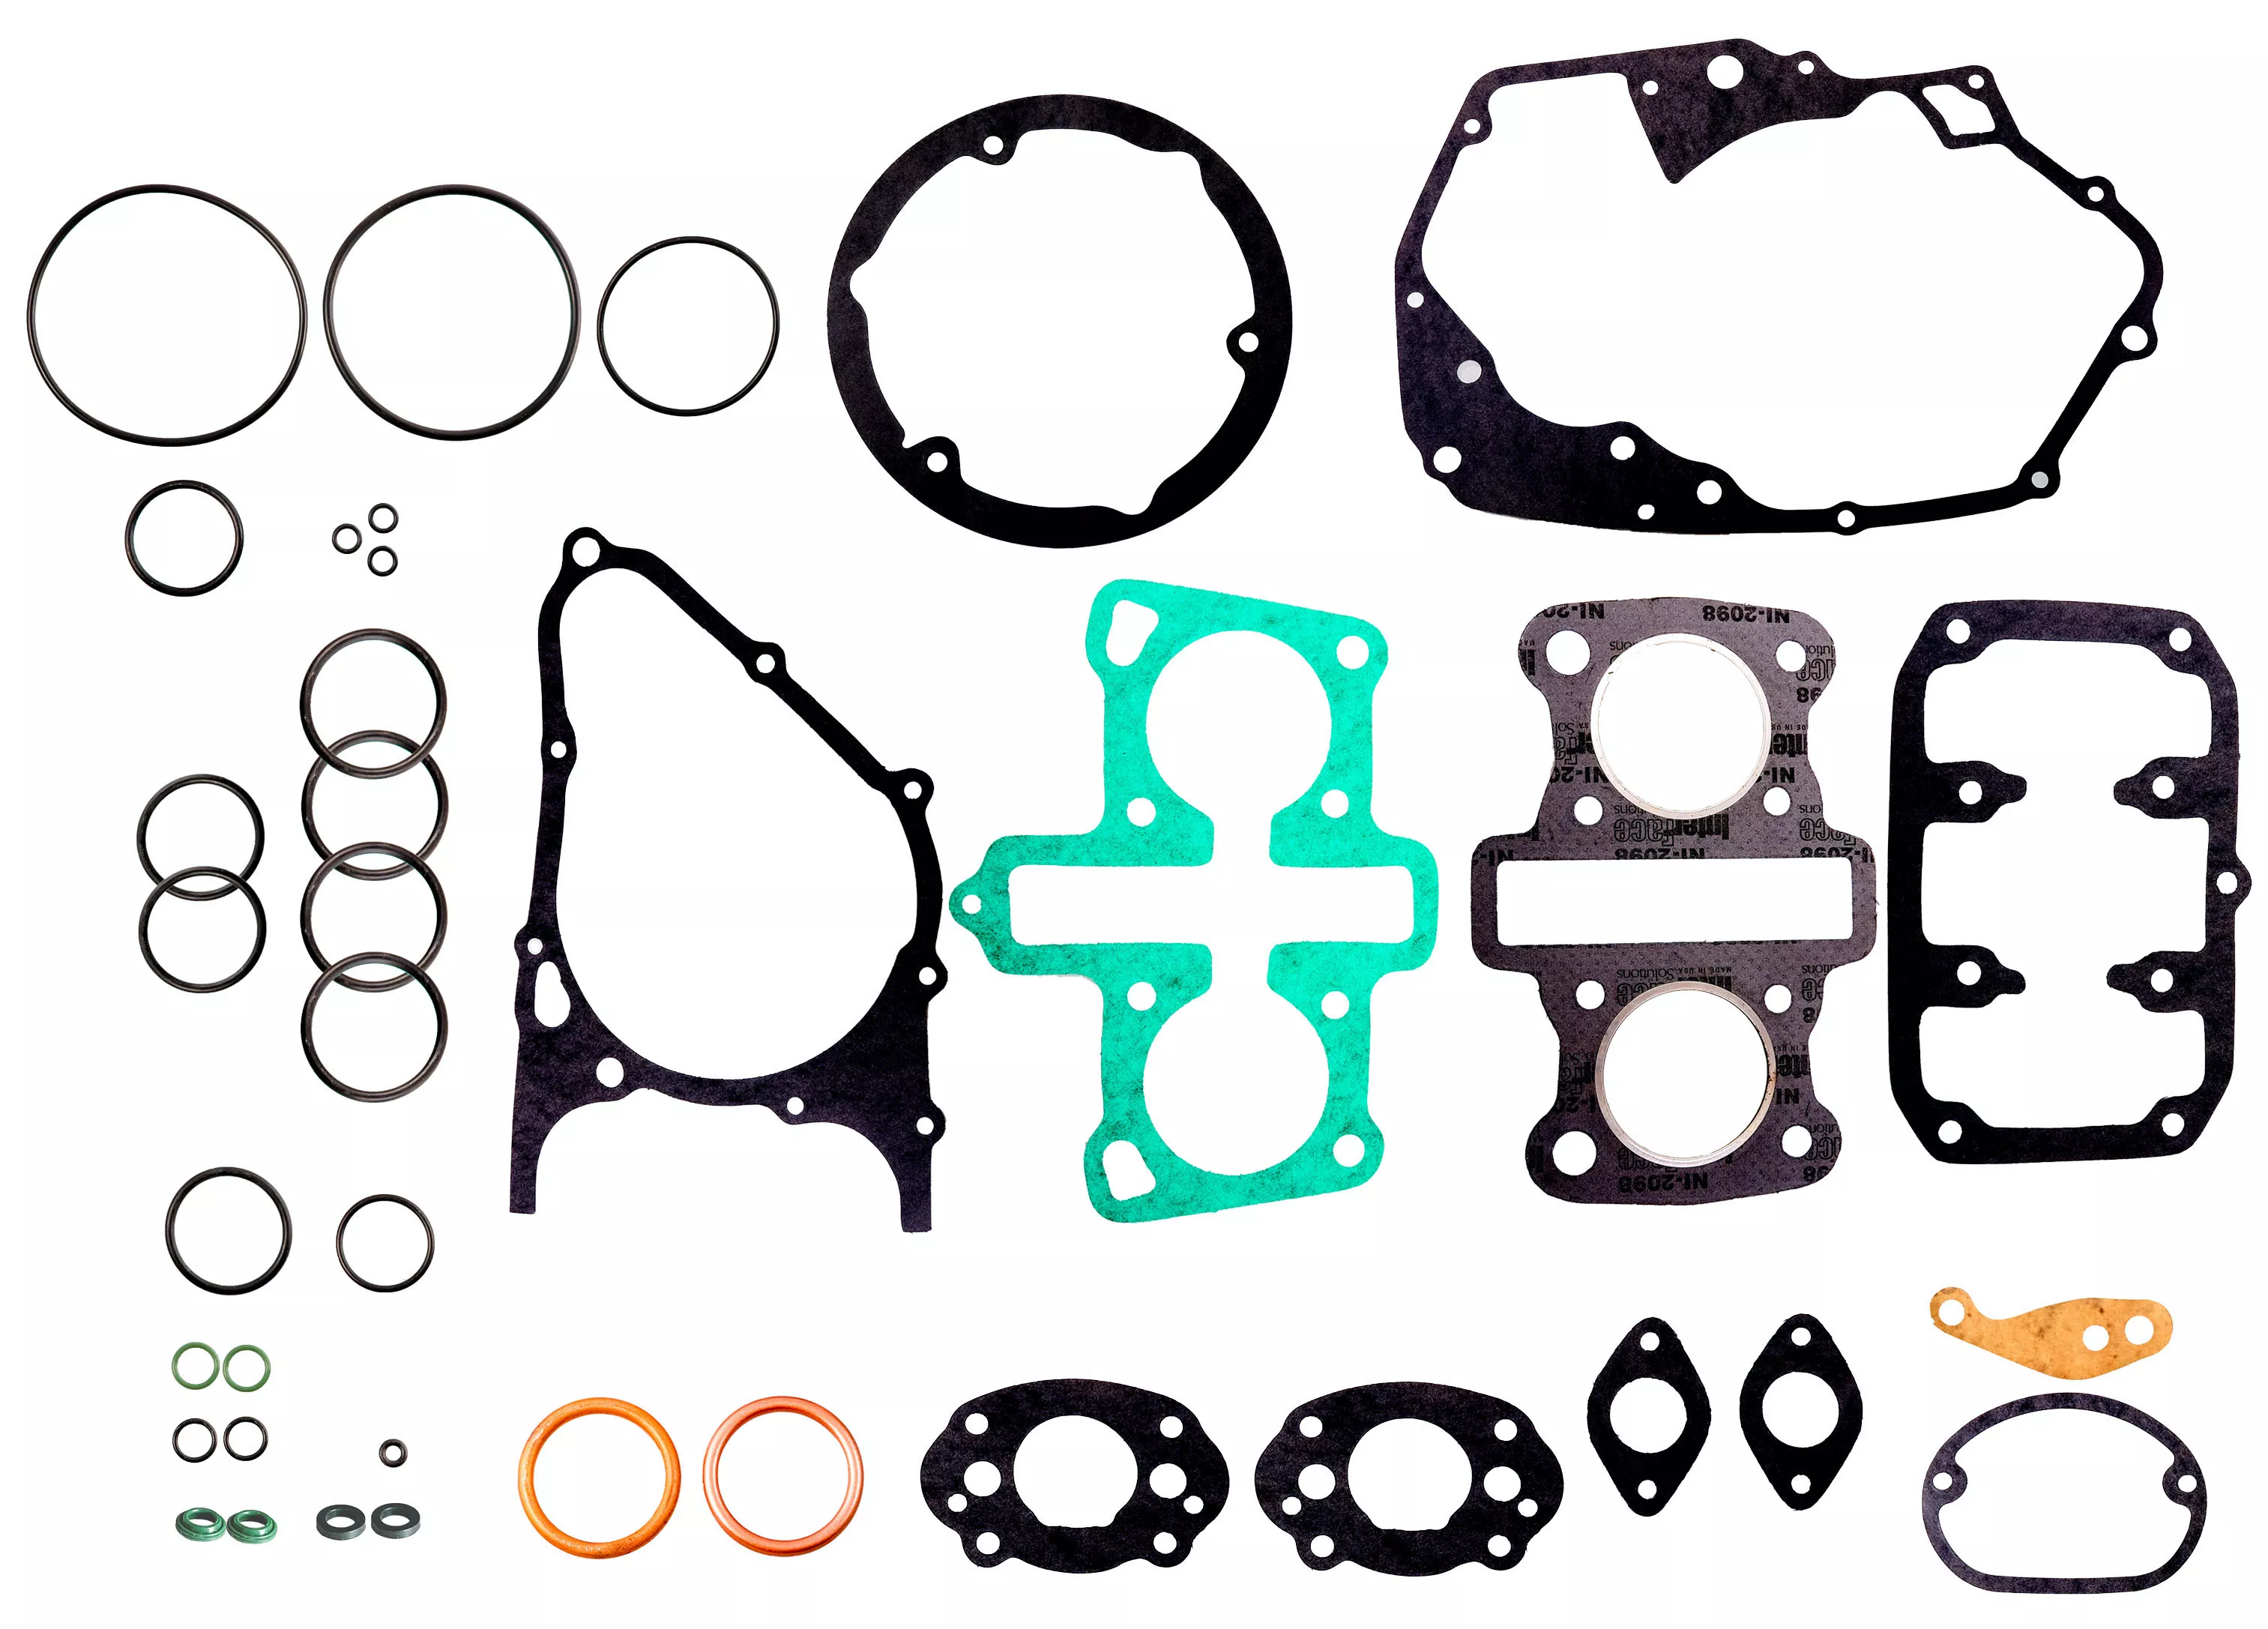
Staring at your disassembled CB175 engine can be stressful — but there is no better time to replace your original paper gaskets, O-rings, and exhaust gaskets with our complete Overhaul kit. All 25 gaskets and O-rings covering the top to bottom of a Honda CB175 family engine, including the head gasket, cylinder base gasket, and exhaust valve stem seals — none of which we sell individually.
Why You Need This
The Overhaul kit is the top tier of three CB175 family gasket kits (smallest is Oil Change A–H, middle is Service A–M, this is A–Y). Choose this kit when the head is coming off — for a head gasket leak, a valve job, piston or ring replacement, or a full top-end and bottom-end reseal. Letters A–H handle the routine oil-change paper and O-rings; I–M cover the points cover, intake manifold gaskets and O-rings, left crankcase cover, and top cam cover; N–Y add the head gasket, cylinder base gasket, exhaust gaskets, camshaft end cover gaskets, valve cover O-rings, exhaust guide O-rings, cam chain tensioner O-ring, head dowel oil passage O-rings, and exhaust valve stem seals — the parts only accessible once the head is off.
Any time the engine is apart for an overhaul, every paper gasket, O-ring, and exhaust gasket should be replaced. Reusing a 50-plus-year-old paper head gasket or composite exhaust gasket is the fast path to a fresh leak after the first heat cycle.
Specifications
| Spec | Detail |
|---|---|
| Fits Models | CB175 K3–K7 (1969–1973), CL175 K3–K7 (1969–1973), SL175 K0 (1970), SL175 K1 (1971–1972) |
| Replaces OEM Parts | 91301-216-000, 91305-426-003, 91305-216-000, 91310-MG7-003, 91305-634-961, 91309-700-000, 91309-302-000, 91304-HB3-003, 91302-200-000, 91302-943-003, 15219-302-000, 11691-354-306, 11691-216-000, 11691-354-000, 11394-302-306, 11394-302-010, 30391-216-306, 30391-216-000, 16173-253-004, 16229-235-306, 16229-235-000, 11395-302-307, 11395-302-010, 12391-354-306, 12391-216-000, 12391-354-000, 12191-235-306, 12191-235-010, 12251-235-405, 12251-235-000, 18291-MN5-650, 18291-KE5-000, 18291-306-000, 12394-216-306, 12394-216-000, 91302-001-710, 91302-001-000, 91354-371-000, 91354-702-000, 91301-428-003, 91301-MG2-790, 91301-MG2-791, 91302-216-000, 91302-500-000, 91305-028-900, 91305-028-158, 91302-315-000, 91301-200-000, 14730-028-000, 14730-028-013, 14733-230-000 |
| Sold As | Set (25 gasket types, 38 individual pieces — Letters A through Y) |
Note — Letter P is a composite exhaust gasket. The CB175 family uses a different exhaust port diameter than the CB350/CB360 twins. The standalone version is sold separately as our Composite Exhaust Gaskets for CB175 / CB200 / CB500 / CB550 (OEM 18291-216-000). Do not substitute the CB350/CB360 copper gasket — it will not seat correctly.
Note — this kit covers gaskets and O-rings only. It does not include pistons, piston rings, valves, valve guides, valve springs, or the cam chain. We sell replacement intake and exhaust valves, the CB175 cam chain, and “Pulsar” oversize piston kits separately.
Note — head gasket and cylinder base gasket are not sold individually. This kit is the only way to source those two parts through CMC. We bundle them with the other top-end and bottom-end gaskets that should be replaced any time the head comes off.
Model-Specific Notes
- 1968 CL175 K1 sloper engine does NOT fit. The sloper engine is based on the CB160 platform — a different engine architecture from the upright CB175/CL175 motor used 1969 onward. We do not currently stock a sloper-platform gasket kit.
- CD175 and CA175 share the same engine architecture as CB175/CL175 and the kit fits those bikes too — not officially listed in our chart but confirmed across multiple customer orders.
- SL175 production years: K0 (1970), K1 (1971–1972). Honda used the K1 designation for both 1971 and 1972 model years — there is no SL175 K2.
- CB175 bored to 200cc — the CB175 head gasket bore (Letter O) is sized for the factory 52mm cylinder. If your CB175 was overbored toward 200cc, measure the cylinder OD and ask us before ordering — either this kit or the CB200 Overhaul kit (4178) may be correct depending on the bore.
- Does not fit CB200 / CB350 / CB360 / CB450 / CB500K / CB500T / CB550. Each is a different engine architecture with different gasket sizes and torque specs.
What’s in the Kit
This Overhaul kit includes everything from the Oil Change kit (Letters A–H) and the Service kit (A–M), plus 12 additional gaskets and O-rings (N–Y) that you only need when the head is off.
| Kit | Letter | Gasket | Qty |
|---|---|---|---|
| 4176 Oil Change Gasket Kit (Includes Gaskets A–H) |
A | Stator Rotor Cover Bolt O-Rings | 3 |
| B | Oil Rotor Cover O-Ring | 1 | |
| C | Oil Filter Cover O-Ring Small | 1 | |
| D | Oil Filter Cover O-Ring Large | 1 | |
| E | Oil Drain Plug O-Ring | 1 | |
| F | Oil Pump Gasket | 1 | |
| G | Stator Rotor Cover Gasket | 1 | |
| H | Right Crankcase Cover Gasket | 1 | |
| 4177 Service Gasket Kit (Includes Gaskets A–M) |
I | Points Cover Gasket | 1 |
| J | Intake Manifold O-rings | 2 | |
| K | Intake Manifold Gaskets | 2 | |
| L | Left Crankcase Cover Gasket | 1 | |
| M | Top Cam Cover Gasket | 1 | |
| 4175 Overhaul Gasket Kit (Includes Gaskets A–Y) |
N | Cylinder Base Gasket | 1 |
| O | Head Gasket | 1 | |
| P | Exhaust Gaskets (composite) | 2 | |
| Q | Camshaft End Cover | 2 | |
| R | Dipstick O-Ring | 1 | |
| S | Clutch Lifter Adjuster O-Ring | 1 | |
| T | Valve Cover O-Ring | 4 | |
| U | Exhaust Guide to Head O-Rings | 2 | |
| V | Tensioner Bolt O-Ring | 1 | |
| W | Cylinder Head Dowel Oil Passage O-Ring | 2 | |
| X | Exhaust Valve Stem Seal Upper | 2 | |
| Y | Exhaust Valve Stem Seal Lower | 2 |
Installation
Difficulty: Advanced
Tools needed: Standard hand tools, torque wrench (kg-cm or in-lb scale), Valve Spring Compressor Tool, single-edge razor blade, acetone, Honda Bond 4 gasket sealer, anti-seize lubricant.
- Drain all oil. For a full overhaul, the engine has to come out of the frame: remove the fuel tank, disconnect the starting motor cable, disconnect the wiring coupler, then unbolt the engine hanger bolts and lift the engine out.
- Strip the engine top end down: remove the eight 8mm screws on the head cover, then unscrew the 6mm bolts and lift off the cylinder head. To simplify work, hang the cam chain with a wire before disconnecting it at the master link.
- Remove the cylinder jugs and pistons, then split the bottom end if needed: remove the AC generator and starting clutch, the oil pump and filter clutch, then the transmission gear and kickstart shaft.
- Remove all old gasket material with a single-edge razor and acetone. Inspect every sealing surface for warpage. A head that has lost compression often needs decking before reassembly — see our Cylinder Head Machining Service for CB175 family heads, and our Cylinder Boring & Honing Service if cylinders need work.
- Compress the valve springs, remove cotters and springs, then remove the old exhaust valve stem seals (Letters X and Y — 2 upper + 2 lower for the 2 exhaust valves on a CB175 twin). Reference video: Remove and Install Valve Springs On Your Vintage Honda.
- On reassembly, install the new exhaust valve stem seals (X + Y) before the springs. Oil each valve stem before sliding it through the guide, then seat the seal squarely. Note: the CB175 only seals the exhaust valve stems — the intake valves run dry from the factory.
- For cylinder reinstall, the cylinder base gasket (Letter N) and the dowel/oil-passage O-rings (Letter W) seat the cylinder to the upper crankcase. Press base O-rings into the machined grooves until they sit flush — not poking out — using the flat side of a thick feeler gauge as a dull installation tool. Apply a small bead of Honda Bond 4 around the oil passages on the upper crankcase before laying the new base gasket. Do not use RTV silicone — it sheds debris into the oil galleries.
- The head gasket (Letter O) installs dry between cylinder and head. Do not apply sealer to the head gasket itself.
- Reinstall the cam chain guide roller, two dowel pins and O-ring, then reassemble the cylinder with the cam chain in place using a piston ring compressor.
- Torque the 8mm head cover hold-down nuts to 2.3–2.8 kg-m (16.6–20.2 ft-lbs). Use the criss-cross sequence and torque in stages — uneven loading is what cooks head gaskets.
- Set valve timing: rotate the crankshaft so the timing mark on the AC generator rotor aligns with the index mark on the right crankcase cover, then install the cam sprocket and chain.
- Adjust the cam chain: loosen the tensioner mounting bolt to release chain tension, then re-tighten to 0.3–0.5 kg-m (2.1–3.6 ft-lbs). Slack cam chains cause engine noise, lost power, and ignition timing drift — check this anytime the engine is back together.
- Set valve clearances to 0.05 mm (0.002 in) for both intake and exhaust, engine cold. The CB175 spec is unusual — intake and exhaust use the same clearance, unlike most other Honda twins.
- Fill with 1.5 L / 1.6 US qt of SAE 10W-40 100% mineral oil. Add 2 oz of Zinc ZDDP additive per quart at first fill.
- Reference our KB article on the post-rebuild tune-up: How to adjust the cam chain and valve clearances on the Honda CB175 / CL175 / SL175 / CB200 / CL200.
Installation Tip: Clean all sealing surfaces with a razor blade and acetone. Lightly grease new paper gaskets when installing — it prevents sticking and lets you re-separate the joint later without ripping the gasket.
Related products
-
- Sale!
- hot sale
Yadea KS5 & KS5 Pro Kickstand – Genuine OEM
- Original price was: $7.20.$4.60Current price is: $4.60.
- Add to cart
-
- Sale!
- hot sale
Yadea KS3 & KS3 Lite Front Fender – Yellow OEM Replacement
- Original price was: $4.00.$3.14Current price is: $3.14.
- Add to cart
-
- Sale!
- hot sale
Genuine Yadea Trooper 01/Trooper Plus Motor Controller – OEM
- Original price was: $88.00.$55.16Current price is: $55.16.
- Add to cart
-
- Sale!
- hot sale
Knobby tire 12.5″ (Gen 2.0)
- Original price was: $28.00.$18.12Current price is: $18.12.
- Add to cart
-
- Sale!
- hot sale
Yadea KS6 Pro Rear Hub Motor w/ Tire – Genuine OEM
- Original price was: $130.40.$99.99Current price is: $99.99.
- Add to cart
-
- Sale!
- hot sale
YADEA COCOA REAR WHEEL ASSEMBLY
- Original price was: $199.20.$102.45Current price is: $102.45.
- Add to cart
-
- Sale!
- hot sale
YADEA Y80 REAR AXLE
- Original price was: $7.20.$4.10Current price is: $4.10.
- Add to cart
-
- Sale!
- hot sale
Chair clamp set
- Original price was: $59.96.$31.88Current price is: $31.88.
- Add to cart