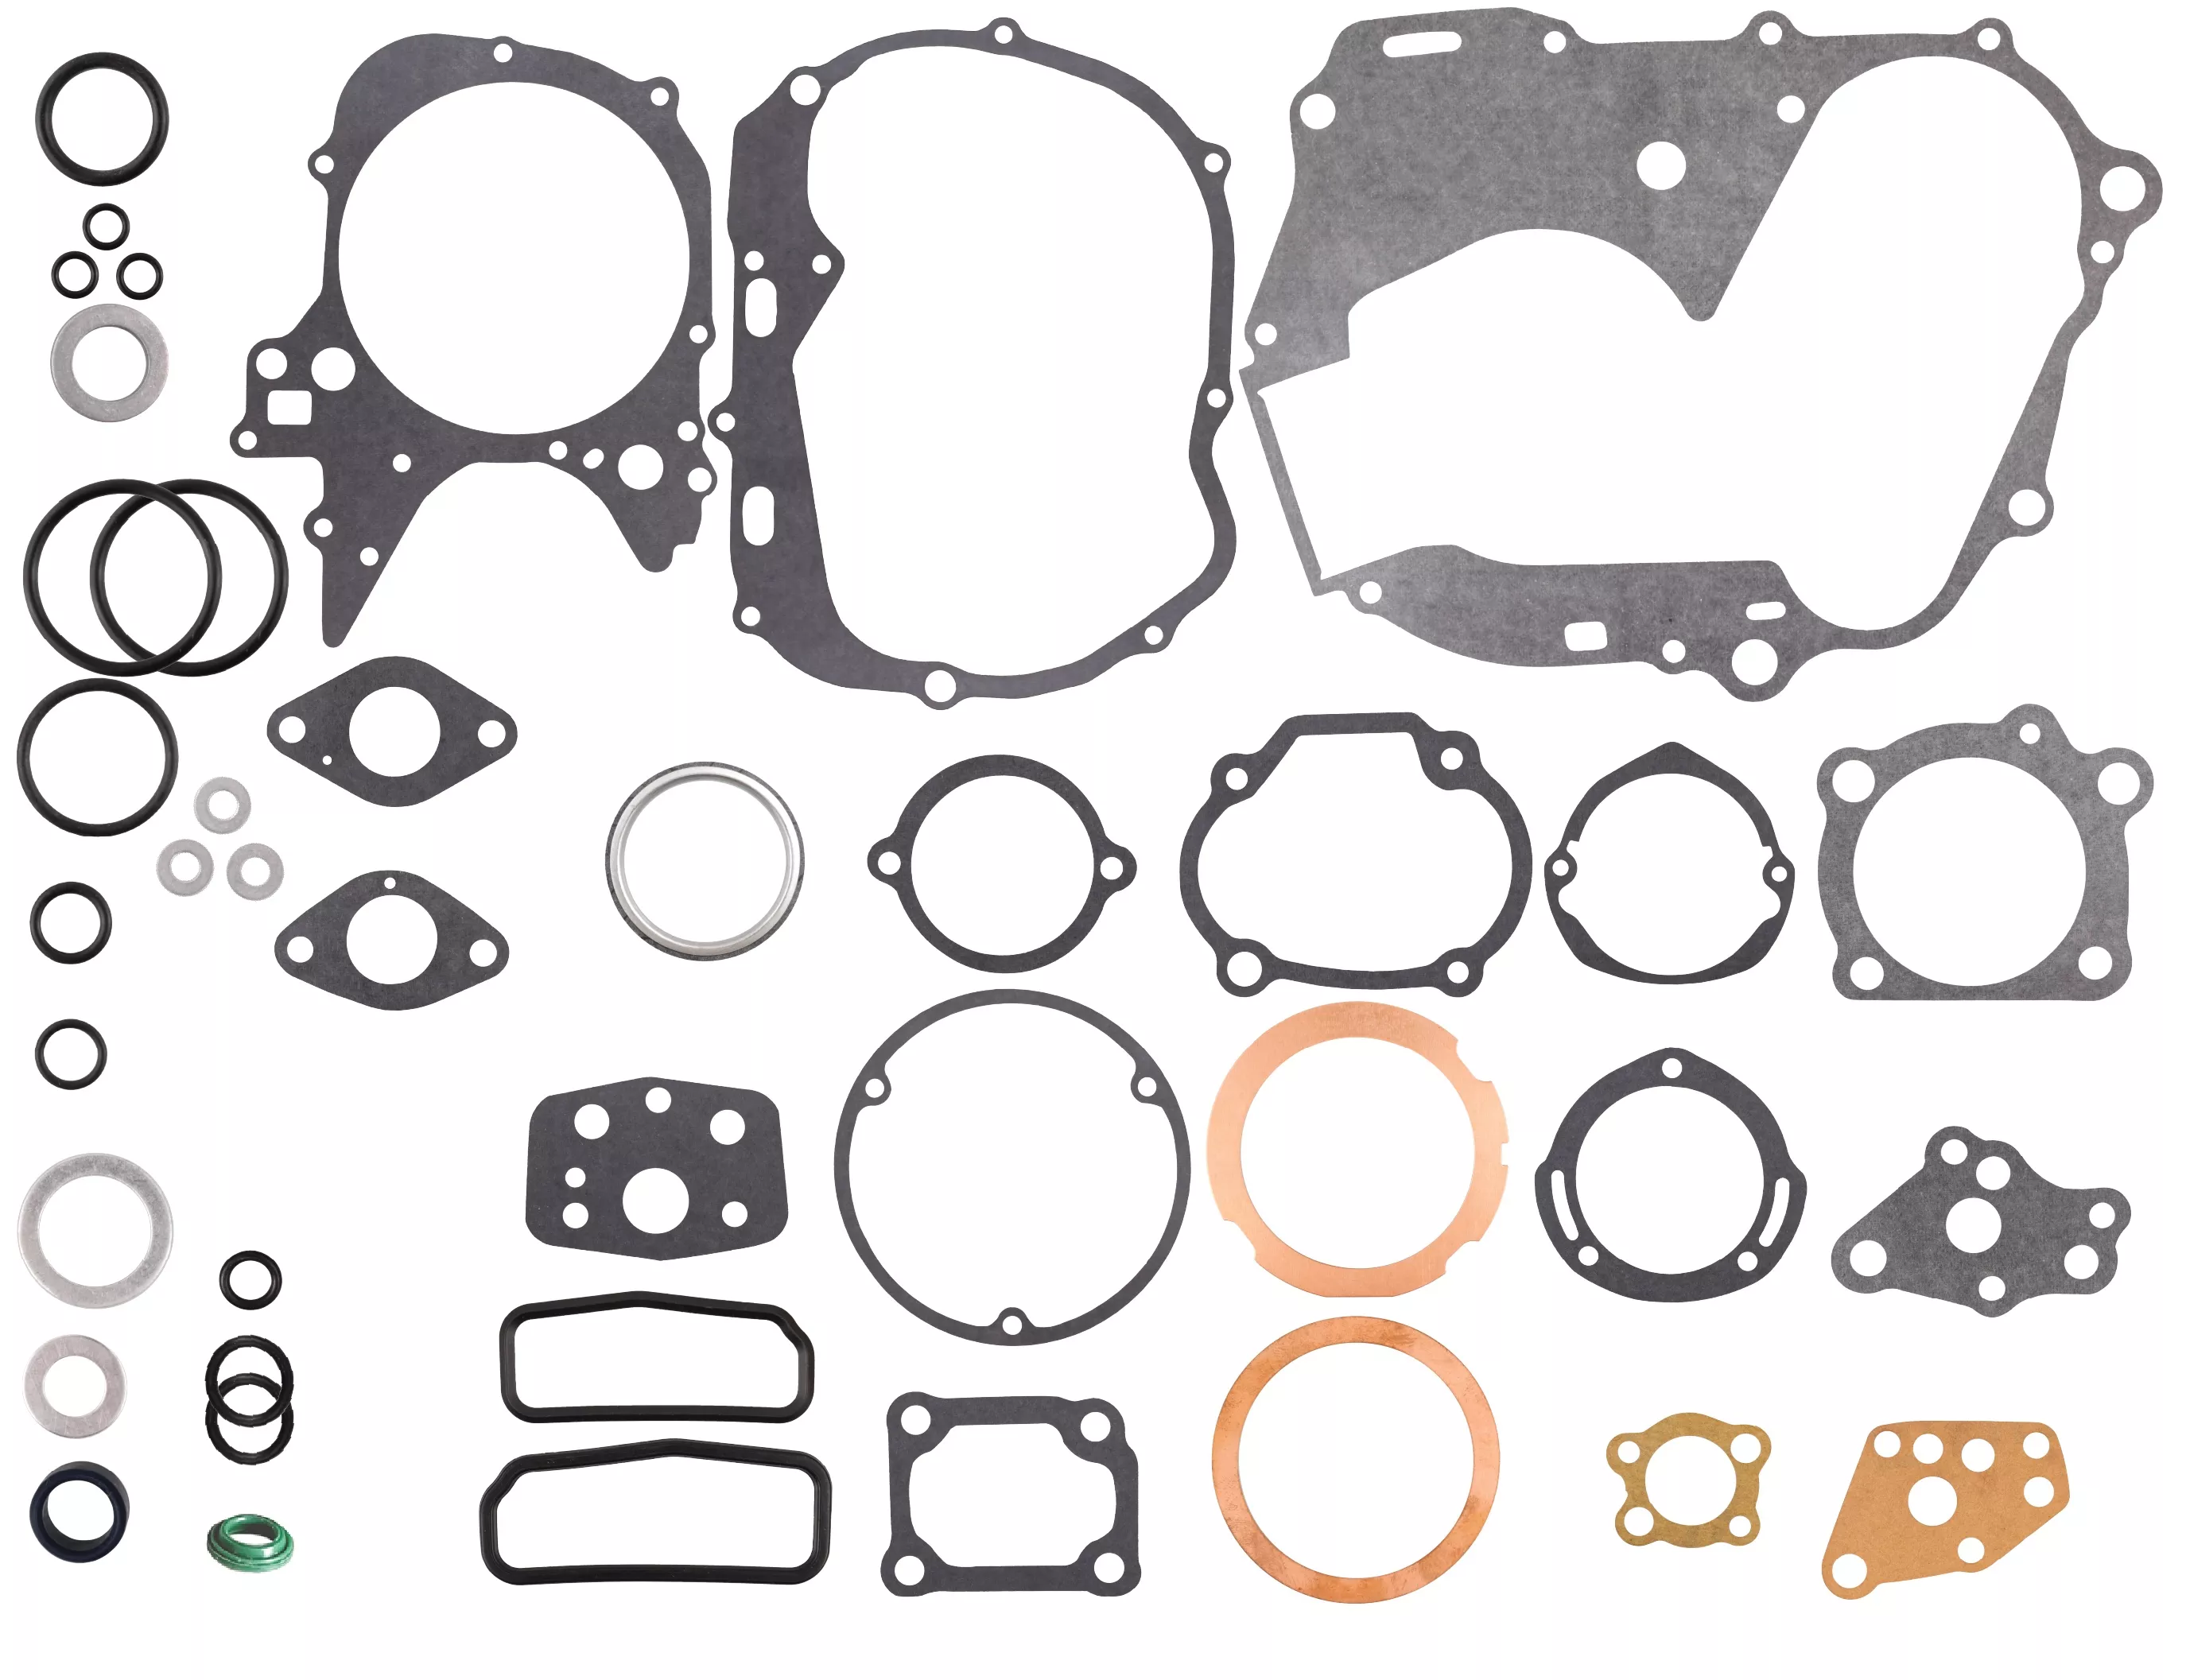
Gasket Kit (Overhaul) | Honda CT90 / Trail 90
Original price was: $32.00.$20.69Current price is: $20.69.
48 in stock
Description
Honda CT90 / Trail 90 Gasket Kit (Overhaul)
Whether it started with a bang or an oil leak, you’re looking at a disassembled CT90 engine and wondering what to put back in. This is the top tier of three CT90 gasket kits — every paper gasket, O-ring, and crush washer you’ll touch during a full top-end and bottom-end rebuild, including BOTH styles of head gasket and BOTH cam chain chamber rubbers so you can match whichever year-era your CT90 actually has.
Why You Need This
An Overhaul kit is what you order when the cylinder head comes off — for a head gasket leak, a valve job, a piston replacement, a stuck cam chain, or a full bottom-end rebuild. Every paper gasket compresses when it’s first torqued, and every O-ring takes a permanent set against the surface it sealed against. Putting an engine back together with the old gaskets is a guaranteed oil weep within the first few heat cycles.
The CT90 OHC single-cylinder is built to last, but Honda’s service data calls for top-end teardown well under 8,000 miles — and most of the bikes coming through our shop are well past that. When you’re already this deep into the engine, the cost of the gasket kit is small money compared to having to crack the case again for a leak you could have prevented.
Specifications
| Spec | Detail |
|---|---|
| Fits Models | CT90 / Trail 90 K0 (1966–1968), K1 (1969), K2 (1970), K3 (1971), K4 (1972–1973), K5 (1974), K6 (1975), K7 (1976), K8 (1977), K9 (1978–1979) |
| Replaces OEM Parts | 91301-216-000, 91307-KF0-003, 91307-035-000, 94109-12000, 90407-231-000, 90407-259-000, 11691-028-306, 11691-028-000, 11393-028-306, 11393-028-020, 22112-121-632, 22112-028-000, 22112-028-306, 22112-121-630, 30391-459-952, 30391-028-000, 30391-459-950, 16201-077-306, 16201-077-010, 17119-046-306, 17119-046-000, 11395-053-306, 11395-053-010, 11693-459-962, 11693-053-030, 11693-053-306, 11693-459-960, 30392-028-306, 30392-028-020, 18291-028-306, 18291-028-000, 12394-121-630, 12394-028-010, 12394-028-020, 12391-121-630, 12391-028-000, 12391-028-306, 90441-028-010, 16010-102-305, 16010-102-700, 91304-HB3-003, 91302-200-000, 91302-943-003, 91306-HB3-003, 91303-001-000, 91301-053-000, 91302-HB3-004, 12191-121-630, 12191-028-020, 12191-028-306, 15119-028-306, 15119-028-030, 15119-028-020, 15119-028-010, 15119-028-000, 15128-028-030, 12251-028-030, 12901-028-020, 12902-121-710, 12902-028-020, 12902-105-690, 11191-052-306, 11191-052-000, 90441-035-000, 14730-028-013, 12261-105-690, 12261-028-000, 90405-001-000, 91306-028-000 |
| Sold As | Kit (33 gasket types, 40 individual pieces — Letters A through AG, including both Early- and Late-style head gaskets) |
Note — Letter X includes BOTH Early and Late style head gaskets (qty 2). Honda updated the head gasket design in the K3/K4 era (around 1971–1972) when the cam chain tensioner architecture changed. Rather than ask you to guess which one your bike uses, we ship both. Install the one that matches your bike’s casting; keep the other as a spare.
Note — Letter AD is a single exhaust valve stem seal. The CT90 only seals the exhaust valve stem — the intake valve runs dry from the factory. If your kit looks like it’s “missing a seal,” it isn’t — that’s how Honda built it.
Note — Letter V (Oil Pump To Crankcase) and Letter W (Oil Pump Cover) are two different gaskets. V seals the oil pump body to the crankcase; W seals the oil pump cover to the pump body. Both are oil-pump-related but they live on opposite faces of the pump. Use both during reassembly.
Note — this kit covers gaskets, O-rings, and sealing washers only. It does not include pistons, piston rings, valves, valve guides, valve springs, the cam chain, or the cam chain tensioner. We sell those separately: Pulsar piston kit (standard + overbore), CT90 piston rings, “Airlock” CT90 valves, CT90 cam chain, CT90 cam chain tensioner.
Model-Specific Notes
- CT90 K0 1966–1968: The vast majority of K0 frames use the dual-range sub-transmission and fit this kit. There is a very early K0 variant without the dual-range transmission whose points cover gasket footprint may differ — if your K0 has a 3-speed only (no Hi/Lo lever) and you’re unsure, contact us with your frame serial number before ordering.
- K0–K3 (1966–1971) use a hydraulic-only cam chain tensioner. K4 and later (1972–1979) use a mechanical tensioner with an external adjuster. The kit ships both styles of cam chain chamber rubber (Letters Y and Z) and the mechanical tensioner’s adjuster cover seals (Letters AB and AC) — install only the parts your bike uses; the others are spares for the next rebuild.
- Does NOT fit ST90. The ST90 uses a manual clutch and different transmission internals from the CT90’s centrifugal auto-clutch and dual-range sub-transmission — its gaskets are not the same.
- Does NOT fit CT110, C90, S90, or any non-CT90 Honda 90. The CT-series engine layout is unique to the Trail 90 line.
What’s in the Kit
This Overhaul kit includes everything from the Oil Change kit (Letters A–F) and the Service kit (Letters A–T, no M), plus 14 additional gaskets and O-rings (M and U through AG) for the cylinder head, cylinder base, oil pump, cam chain chamber, crankcase split, and valve guide work — the gaskets you only touch when the head and cases come apart.
| Kit | Letter | Gasket | Qty |
|---|---|---|---|
| 4318 Oil Change Gasket Kit (Includes Gaskets A–F) |
A | Stator Rotor Cover Bolt O-Rings | 3 |
| B | Oil Dipstick O-Ring | 1 | |
| C | Oil Drain Plug Crush Washer | 1 | |
| D | Stator Rotor Cover Gasket | 1 | |
| E | Right Crankcase Cover Gasket | 1 | |
| F | Oil Filter / Clutch Basket Cover Gasket | 1 | |
| 4319 Service Gasket Kit (Includes Gaskets A–T, no M) |
G | Points Cover Gasket | 1 |
| H | Carburetor To Intake Manifold Gasket | 1 | |
| I | Intake Manifold To Engine Gasket | 1 | |
| J | Left Crankcase Cover Gasket | 1 | |
| K | Subtransmission Cover Gasket | 1 | |
| L | Points Base Gasket | 1 | |
| N | Rocker Arm Cover Gasket | 1 | |
| O | Cylinder Head Cover Gasket | 1 | |
| P | Point Base Sealing Washers | 3 | |
| Q | Carburetor To Intake Manifold O-Ring | 1 | |
| R | Valve Cover O-Rings | 2 | |
| S | Clutch Lifter Adjuster O-Ring | 1 | |
| T | Subtransmission Selector O-Ring | 1 | |
| 4320 Overhaul Gasket Kit (Includes Gaskets A–AG) |
M | Exhaust Crush Gasket | 1 |
| U | Cylinder Base Gasket | 1 | |
| V | Oil Pump To Crankcase Gasket | 1 | |
| W | Oil Pump Cover Gasket | 1 | |
| X | Head Gasket (Early and Late Style) | 2 | |
| Y | Cam Chain Chamber Base Rubber Gasket (A) | 1 | |
| Z | Cam Chain Chamber Base Rubber Gasket (B) | 1 | |
| AA | Crankcase Split Gasket | 1 | |
| AB | Cam Chain Tensioner Adjuster Cover Sealing Washer | 1 | |
| AC | Cam Chain Tensioner O-Ring | 1 | |
| AD | Exhaust Valve Stem Seal | 1 | |
| AE | Cylinder Header Dowel Oil Passage Rubber Gasket | 1 | |
| AF | Oil Pipe Joint Bolt Crush Washer | 1 | |
| AG | Valve Guide Base O-Rings | 2 |
Installation
Difficulty: Advanced
Tools needed: Standard hand tools, torque wrench (kg-cm or in-lb + ft-lb scales), valve spring compressor (Honda valve spring tool or equivalent), 9mm wrench for the valve adjuster jam nut, feeler gauge set, single-edge razor blade, acetone, Honda Bond 4 gasket sealer, anti-seize lubricant.
Don’t use RTV silicone anywhere in this engine — pieces of RTV migrate and plug oil galleries. Honda Bond 4 (or 3M ThreeBond equivalent) only.
- Drain the oil and remove the engine from the frame for full top-end + bottom-end work. The cylinder head can come off in-frame, but a crankcase split needs the engine on a bench.
- Remove the exhaust system. Take off the muffler bracket bolts at the frame first, then unbolt the two flange nuts at the cylinder head. The Letter M Exhaust Crush Gasket will be at the head port — clean the port surface, install the new crush gasket, and on reassembly tighten the muffler bracket bolts first, then the flange nuts last so the pipe doesn’t bind.
- Pull the carburetor and intake manifold. Letters H + I + Q (paper gaskets + O-ring) install at the carb-to-manifold and manifold-to-engine interfaces. Light grease on the new paper gaskets keeps them in place during reassembly.
- Remove the right crankcase cover (the CT90 has no separate filter access panel — the full cover comes off). This is the same cover the Oil Change kit’s Letters A–F service. The clutch and centrifugal auto-clutch live behind it.
- Disassemble the cylinder head. Remove the four 8mm head nuts (factory torque on reassembly: 2.0–2.5 kg-m / 14.5–18.1 ft-lbs in a cross pattern), lift off the head. Letter X gives you both Early and Late style head gaskets — the Late style was introduced around the K3/K4 cam chain redesign. Install the one matching your bike’s casting and keep the other as a spare.
- Inspect head flatness with a straightedge and feeler gauge — spec is 0.05 mm (0.002 in) maximum warpage at the mating surface. If your head is over the limit, send it to us for a deck job via our Cylinder Head Machining Service (CT90 supported) before reinstall.
- If pulling valves: Compress the valve springs with the spring compressor tool, remove the cotters, retainers, and old exhaust valve stem seal (Letter AD — only one seal, on the exhaust valve; the intake runs dry by design). If you’re replacing valve guides, Letter AG gives you the two valve guide base O-rings that seat where the new guide presses into the head. Walk-through video for valve spring work: Remove and Install Valve Springs on Your Vintage Honda.
- Remove the cylinder. The Letter U Cylinder Base Gasket and Letter AE Oil Passage Rubber both live here. On reassembly, apply a small bead of Honda Bond 4 around the oil passages on the upper crankcase and the bottom of the cylinder before laying the new Letter U gasket. Do not apply sealer to the head gasket itself (Letter X) — head gaskets install dry. Walk-through video: Cylinder Jug to Piston Installation.
- If splitting the crankcase (bottom-end rebuild): remove the cylinder, head, clutch, gear shift spindle, and split the right crankcase from the left. Letter AA (Crankcase Split Gasket) seals between the halves — clean both mating faces with acetone, apply a thin coat of Honda Bond 4, and seat the new gasket with the two factory dowel pins fitted. Mating surface flatness spec is 0.05 mm (0.002 in) on both halves.
- Oil pump service (Letters V + W). The oil pump unbolts with three 6mm screws plus a special hex bolt. Letter V seals the pump body to the crankcase; Letter W seals the cover to the pump body — install both during reassembly.
- Cam chain chamber (Letters Y + Z) and tensioner (Letters AB + AC). Both styles of cam chain chamber rubber are in the kit; install whichever matches your engine’s chain tunnel. For K4 and later (mechanical tensioner), use Letter AB sealing washer under the tensioner adjuster cover bolt and Letter AC O-ring at the adjuster body. For K0–K3 (hydraulic-only tensioner), AB and AC are spares for a future rebuild — not installed.
- Reassemble in reverse order. Set valve timing: rotate the crankshaft so the rotor’s T mark aligns with the index mark before installing the cam chain on the cam sprocket. Tighten cylinder head nuts in a cross pattern to the spec above. After the engine is back together, set valve clearance to 0.05 mm intake and exhaust (cold), set point gap to 0.012–0.016 in, and set ignition timing to the F mark.
- Refill with oil. 0.9 L / 0.95 US qt SAE 10W-40 100% mineral plus 2 oz of zinc additive per quart. Avoid the semi-synthetic diesel oils (Shell Rotella T4, Chevron Delo 400, Mobil Delvac 1300 — all reformulated to semi-synthetic in late 2023): friction modifiers cause the wet centrifugal clutch to slip.
Installation Tip: Clean all surfaces with a razor blade and acetone before any gasket goes near them. Lightly grease new paper gaskets — it keeps them in place during reassembly and lets the joint come apart later without tearing the gasket. Use anti-seize on the cover bolt threads.
Related products
-
- Sale!
- hot sale
Yadea KS3 & KS3 Lite Front Fender – White OEM Replacement
- Original price was: $4.00.$2.47Current price is: $2.47.
- Add to cart
-
- Sale!
- hot sale
Yadea KS3 & KS3 Lite Front Fender – Yellow OEM Replacement
- Original price was: $4.00.$3.14Current price is: $3.14.
- Add to cart
-
- Sale!
- hot sale
Disc brake pads (Bengal – Gen 2.0)
- Original price was: $15.16.$11.29Current price is: $11.29.
- Add to cart
-
- Sale!
- hot sale
Yadea KS5/KS5 Pro Folding Latch Buckle – Genuine OEM
- Original price was: $6.40.$4.96Current price is: $4.96.
- Add to cart
-
- Sale!
- hot sale
Empulse M90 Power Assist
- Original price was: $3,816.00.$2,767.31Current price is: $2,767.31.
- Add to cart
-
- Sale!
- hot sale
Inner tube for 12.5″ tire (Gen 2.0)
- Original price was: $12.00.$6.78Current price is: $6.78.
- Add to cart
-
- Sale!
- hot sale
Yadea KS5 & KS5 Pro Kickstand – Genuine OEM
- Original price was: $7.20.$4.60Current price is: $4.60.
- Add to cart
-
- Sale!
- hot sale
V-brake pads (Gen 2.0)
- Original price was: $7.16.$4.88Current price is: $4.88.
- Add to cart