Petcock | Honda CB350 / CL350 / SL350
Original price was: $32.00.$24.78Current price is: $24.78.
50 in stock
Description
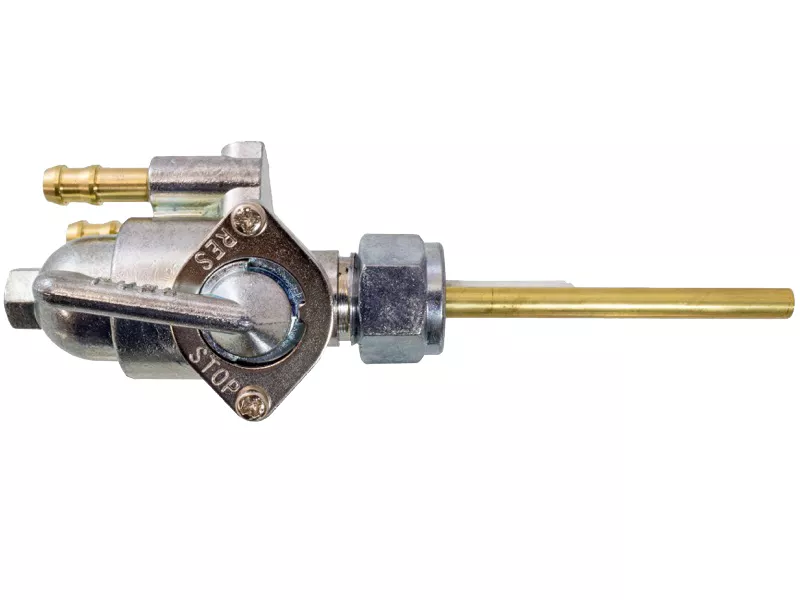
Aftermarket Petcock | Honda CB350 / CL350 / SL350
Leaking fuel, stuck lever, or a petcock so corroded the screen is falling apart? This aftermarket replacement petcock is a direct-fit replica of the original Keihin fuel valve used on Honda CB350, CL350, and SL350 twins from 1968 through 1973. It arrives ready to install with new rubber seals and a filter screen already in place — no rebuild required.
Why You Need This
Original Honda petcocks on these bikes are now 50+ years old. Rubber seals dry out and crack, lever gaskets weep, and brass filter screens corrode or collapse. A leaking petcock drips fuel onto hot engine cases (a fire risk), and a clogged filter screen starves the carburetors at higher RPMs, causing stumbling and stalling. This aftermarket petcock solves both problems with fresh seals and a new screen right out of the box.
If your original OEM petcock is in good shape and just needs new seals, we also sell the OEM petcock rebuild kit and a replacement brass filter screen.
Specifications
| Spec | Detail |
|---|---|
| Replaces OEM Part Numbers | 16950-292-000, 16951-292-000, 16953-298-000, 16961-298-000, 16950-343-670, 90303-268-000 |
| Fits Models | CB350 K0–K5 (1968–1973), CL350 K0–K5 (1968–1973), SL350 K0–K2 (1969–1973) |
| Sold As | Sold Individually |
| Includes | Petcock body, lever, rubber seals, filter screen |
| Design | OEM Keihin-style replica |
Note: This petcock flows enough fuel to supply the carburetors at full throttle. The built-in filter screen is all the filtration you need — inline fuel filters on the fuel lines are not necessary.
Note: A rebuild kit for this CMC aftermarket petcock is also available if your CMC petcock needs new seals down the road. That kit is specific to this aftermarket petcock — it will not fit the OEM Honda petcock (and vice versa).
Installation
Difficulty: Beginner
- Turn the fuel cock lever to the STOP position and remove the fuel line from the old petcock.
- Drain any remaining fuel from the tank into a safe container.
- Remove the old petcock from the tank.
- Clean the mounting surface on the tank — make sure it is free from old gasket material, rust, and debris.
- Rub a small amount of fresh oil on the new petcock-to-tank gasket so it seats smoothly during installation.
- Install the new petcock onto the tank. When tightening, make sure not to pinch the wavy washer between the petcock body and the faceplate. The large nut installs smooth side up and threads on counterclockwise by only about half a turn.
- Reconnect the fuel line and turn the lever to ON or RES to check for leaks before starting the engine.
Before installing a new petcock, clean your fuel tank. Rust, varnish, and sediment inside the tank will clog the new filter screen and shorten the life of the petcock. If cleaning the tank with vinegar, remove the petcock first — the acid can damage the petcock seals and internal components.
Related products
-
- Sale!
- hot sale
Standard tire 12.5″ (Gen 2.0)
- Original price was: $20.00.$11.59Current price is: $11.59.
- Add to cart
-
- Sale!
- hot sale
YADEA COCOA REAR WHEEL ASSEMBLY
- Original price was: $199.20.$102.45Current price is: $102.45.
- Add to cart
-
- Sale!
- hot sale
Genuine Yadea Trooper 01/Trooper Plus Motor Controller – OEM
- Original price was: $88.00.$55.16Current price is: $55.16.
- Add to cart
-
- Sale!
- hot sale
Yadea Elite Prime & KS Series AC Charging Cord (OEM)
- Original price was: $3.20.$1.80Current price is: $1.80.
- Add to cart
-
- Sale!
- hot sale
Battery charger UL/ USA (Gen 2.0)
- Original price was: $19.96.$12.07Current price is: $12.07.
- Add to cart
-
- Sale!
- hot sale
Yadea KS3 & KS3 Lite Front Fender – White OEM Replacement
- Original price was: $4.00.$2.47Current price is: $2.47.
- Add to cart
-
- Sale!
- hot sale
Yadea KS6 Pro Rear Hub Motor w/ Tire – Genuine OEM
- Original price was: $130.40.$99.99Current price is: $99.99.
- Add to cart
-
- Sale!
- hot sale
Inner tube for 12.5″ tire (Gen 2.0)
- Original price was: $12.00.$6.78Current price is: $6.78.
- Add to cart