
Vintage Honda Motorcycle Electrical Connector and Repair Kit
Original price was: $80.00.$46.41Current price is: $46.41.
43 in stock
Description
Vintage Honda Electrical Connector and Repair Kit
A vintage Honda wiring harness usually looks worse than it is. Most electrical problems come down to bad connections, not bad wire, which means the harness can almost always be repaired instead of replaced. This kit gives you the OE-style connectors, terminals, heat shrink, and wire to do it right.
Why You Need This
Decades of previous owners leave a harness full of corroded bullets, hardware-store butt splices, and the odd lamp-cord patch. The fix isn’t a whole new harness, which we don’t sell and most bikes don’t need. It’s repairing the connections back to factory standard.
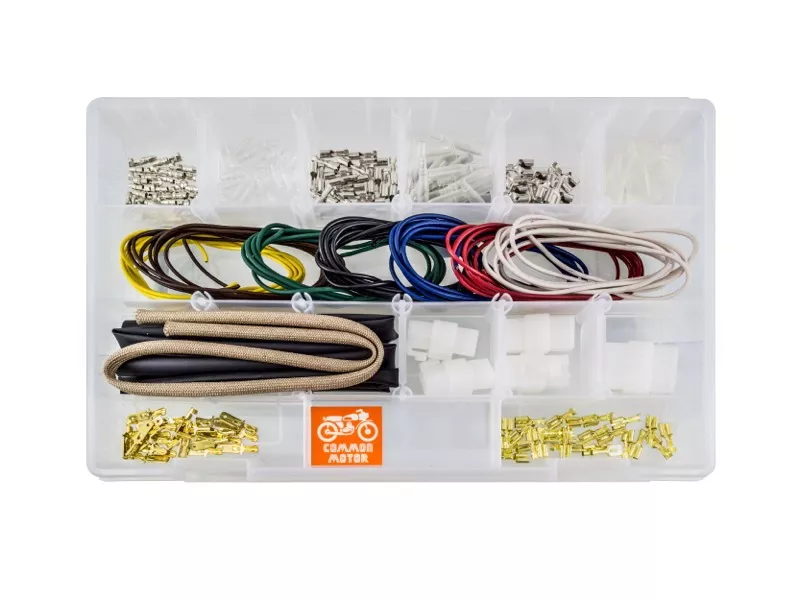
This master kit carries the high-quality Japanese bullet connectors that came on the bike, the multi-pin plastic connectors, heat shrink, and 42 feet of color-coded wire, so you can rebuild any junction on the harness. These are the proper OE-style parts, not the oversized mystery connectors you’ll find at the parts store.
Specifications
| Spec | Detail |
|---|---|
| Fits Models | CT90 / Trail 90, CB175 / CL175 / SL175, CB200 / CL200, CB350 / CL350 / SL350, CB350F, CB360 / CL360 / CJ360, CB400F, CB450 / CL450 / CB500T, CB500 / CB550, CB750 |
| Sold As | Sold as a complete kit |
What’s in the Kit
- Male Bullet Terminals with covers (25)
- Female Bullet Terminals with covers (25)
- Dual-Female Bullet Terminals with covers (10)
- Male Spade Connectors (25)
- Female Spade Connectors (25)
- 3-Pin Plastic Connectors with male & female terminals (2)
- 4-Pin Plastic Connectors with male & female terminals (2)
- 6-Pin Plastic Connector with male & female terminals (1)
- Heat shrink tubing in 1/4″, 3/8″, and 1/2″ diameters (2 ft each)
- 1/4″ thermal heat-shield wire sleeve (2 ft) for ignition-points and stator-cover wires
- 42 ft of 16/18 gauge wire in seven colors (6 ft each: white, blue, black, green, yellow, red, brown)
Installation
Difficulty: Intermediate
Tools needed: Barrel crimp tool (sold separately), soldering iron
- Slide the rubber boot or heat shrink onto the wire first. A little window cleaner helps it slide on.
- Strip the wire and set the terminal. Crimp in two stages: the inner crimp grabs the bare wire, the outer crimp holds the insulation.
- Give the inner crimp a second squeeze with the tip of the crimp tool for a solid connection.
- Solder the connection for a permanent joint, then slide the heat shrink over it and shrink it down.
The recommended wire size for these terminals is 16 gauge. A barrel crimp tool is required to install the bullet terminals and is sold separately.
Related products
-
- Sale!
- hot sale
Xtender Power Assist
- Original price was: $5,267.64.$3,896.27Current price is: $3,896.27.
- Add to cart
-
- Sale!
- hot sale
V-brake pads (Gen 2.0)
- Original price was: $7.16.$4.88Current price is: $4.88.
- Add to cart
-
- Sale!
- hot sale
Genuine Yadea Trooper 01/Trooper Plus Motor Controller – OEM
- Original price was: $88.00.$55.16Current price is: $55.16.
- Add to cart
-
- Sale!
- hot sale
Zippie Backpack
- Original price was: $68.00.$42.63Current price is: $42.63.
- Add to cart
-
- Sale!
- hot sale
Empulse M90 Power Assist
- Original price was: $3,816.00.$2,767.31Current price is: $2,767.31.
- Add to cart
-
- Sale!
- hot sale
YADEA COCOA REAR WHEEL ASSEMBLY
- Original price was: $199.20.$102.45Current price is: $102.45.
- Add to cart
-
- Sale!
- hot sale
Yadea Trooper 01 Chain Tensioner – Genuine OEM
- Original price was: $23.20.$14.92Current price is: $14.92.
- Add to cart
-
- Sale!
- hot sale
Inner tube for 12.5″ tire (Gen 2.0)
- Original price was: $12.00.$6.78Current price is: $6.78.
- Add to cart